Note:
The following procedure must be performed for each time clock that is
affected by the time change.
Open
the ClockLink utility (from the Windows Start Menu go to Programs | TimeForce
and click on "ClockLink").
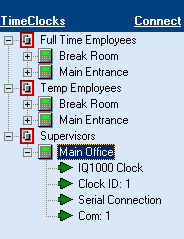
Each
clock that has been inserted into the TimeForce system is listed under
in the TimeClocks section of the
screen. The clocks are displayed in a tree-directory based on the "Clock
Group" that they are assigned to. See Figure DST CLOCKLINK-1.
Figure DST CLOCKLINK-1: Available Clocks
Connect
to the desired clock by selecting the appropriate clock name from the
list and clicking on the "Connect" link in the upper right-hand
corner of the screen. The main "Parameters" screen opens. This
screen is divided into multiple sections, Actions,
Parameters and Default
Schedules.
From
the Actions section of the screen,
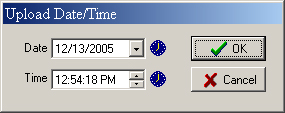
click on the icon. The "Upload Date/Time" window
appears. See Figure DST CLOCKLINK-2.
Figure DST CLOCKLINK-2: Upload Date/Time
Enter
the desired date into the Date
field. Either place your cursor in the field and type the desired date
(mm/dd/yyyy), or click on the down-arrow icon at the end of the field
to select the date from a calendar. By default this field is populated
with the computer's system date. Click on the icon to restore
the system date setting.
Enter
the updated time into the Time
field. Either place your cursor in the field and type the desired time,
or click on the up and down arrow keys at the end of the field to scroll
the time up or down. By default this field is populated with the computer's
system time. Click on the icon to restore the system time
setting.
Once
the correct date and time settings have been specified, click on the icon. A
"Date/Time Uploaded" message appears at the bottom of the screen.
You can now disconnect
from the time clock by clicking on the "Disconnect" link in
the upper right-hand corner of the screen, and exit the ClockLink utility.