Note:
The following procedures must be repeated for each time clock that is
affected by the time change.
Open
the Time Clock Manager utility (from the Windows Start Menu go to Programs
| TimeForce and click on "Time Clock Manager."
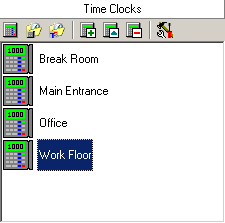
Each
of your time clocks is represented by a "time clock profile"
in the Time Clocks section of
the main Time Clock Manager screen. See Figure DST TIME CLOCK MANAGER-1.
Figure DST TIME CLOCK MANAGER-1: Clock Profiles
Highlight
the desired time clock profile and click on the icon
located in the row of icons at the top of the screen. The "Configure
Clock" screen opens.
A
row of tabs runs across the top of the screen. Ensure that the "Parameters"
tab is selected.
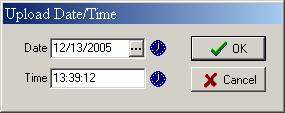
Click
on the [TIME] icon located in the row of icons at the top
of the screen. The "Upload Date/Time" screen opens. See Figure
DST TIME CLOCK MANAGER-2.
Figure DST TIME CLOCK MANAGER-2: Upload Date/Time
Enter
the desired date into the Date
field. Either place your cursor in the field and type the desired date
(mm/dd/yyyy), or click on the ellipsis icon at the end of the field to
select the date from a calendar. By default this field is populated with
the computer's system date. Click on the icon to restore
the system date setting.
Enter
the updated time into the Time
field by placing your cursor in the field and typing the desired time
(in 24-hour format). By default this field is populated with the computer's
system time. Click on the icon to restore the system time
setting.
Once
the correct date and time settings have been specified, click on the icon. A
"Date and Time Uploaded to Clock" dialog box appears.
You can now disconnect
from the clock and exit out of the Time Clock Manager utility.